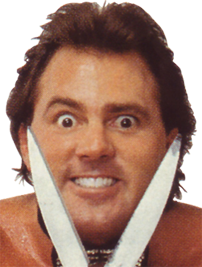
Name: Snyper's -Last Resort- Face Tutorial
Description: How to make hi-res faces even if u are not able to acquire a decent snapshot of the wrestler's face...
Positive Points:
> You are able to mod faces of wrestlers for whom decent pics are extremely hard to find (eg. Legends)
> You are able to mod faces using pics even if the pic has some fuked-up obstable in the way...
> You are able to mod faces using pics in which the skin quality is even worse than the result u'll get using this method
Drawbacks:
> In some cases, the skin texture of the face is so much lost, that the skin appears dead.
[So, remember, this tutorial shud ONLY be followed if u are unable to find a decent snapshot of the wrestler u are modding... example of such snapshot given below]
Snyper's Hi-Res Skin Templates-
((Mediafire Link))~Instructions~
1 ) Find a snapshot of the wrestler's face... and even if the wrestler's skin in the picture is too low-res, just make sure that the wrestler's facial parts, that is, his eyes, his nose and his mouth are clearly visible.

2 ) Using the Rectangular Marquee Tool, cut the face from the picture, and paste it into a new document. Then increase the Image Size of the face (both width and height) by 400% [Image>Image Size>Pixel Dimensions]

3 ) Open up my Hi-Res Skin Templates.... I'll be selecting the Yellow skin template (Make sure that i select the Yellow skin template not only because the skin color of the wrestler was similar, but also because the skin texture on the yellow template was similar to the wrestler's skin texture too.

4) Insert the Hi-Res face as a New Layer into the Face Template. (Name this hi-res face layer as "Facial Parts". Resize it and rotate the hi-res face until its features (eyes, nose and mouth) line up with the blue marks.

5 ) Now we can remove those blue marks by simply deleting that layer (with the blue marks) in the Face Template.
6 ) Make three duplicate layers of the Facial Parts layer. Name one of them "Facial Skin", the second one "Hair" and the third "backup" (in case the other three layers get "destroyed" ). For now, you can hide the "Facial Skin", "Hair" and "Backup" layers, and your layers arrangement and their conditions (that is, whether, the layer is visible or hidden) should be looking like this:-

[url=http://((Image Link))]((Image Link))[/url]
7 ) Make the Facial Parts layer active. Erase the whole face so that the only facial parts that remain on top of the yellow skin template are the eyes, nose and mouth. (IMPORTANT: in some faces, it becomes necessary to erase the area between the eyes and the eyebrow too!!! In the current pic, it wasnt necessary...)

8 ) Now you can make the "Facial Skin" layer visible (making sure it is above the Facial Parts layer!!!). Decrease its opacity to 50%. (The opacity value will vary from face to face. Sometimes an opacity value of 40% will do a more perfect job)
9 ) Next make a Duplicate layer of the "Yellow Skin template" layer, and name it "yellow skin duplicate". Put it on top of all other layers and switch its blend mode to "Color". By now, your layers should be in the following order:-

and your face should be looking something like this:-

10 ) Now you would be noticing that the skin color and texture are blending in nicely with the hi-res skin template, but the eyes and mouth still need a little color-correction. So for now, hide the "yellow skin duplicate" layer, and make the "Facial Skin" layer active.
So for the eyes, using the Polygonal Lasso Tool, select the eyes making sure that the selection doesnt go beyond the white color of the eye. That is:-

(REMEMBER: you can make multiple selections using the Polygonal Lasso Tool by holding the Shift Key before starting to make a new selection)
and for the mouth, make sure that the selection doesnt go beyond the pink color of the lips, that is:-

Once u have selected all the required areas, make the "yellow skin duplicate" layer active. and press the Delete or Backspace key.
So, your Yellow Skin Duplicate layer (if viewed alone) should end up like this:-

and your face texture should end up like this:-

11) Now its time to erase all unnecessary things from the "Facial Skin" layer, that is, the barber shears (of course ) and hair too (hair belongs in the "Hair" layer). This'll be the result.

12) Now make the "Hair" layer visible and place it on top of all the other layers. Using a “Soft Round 35 Pixels†eraser, erase everything except the hair and you'll end up with this:-

13) Next, using the clone stamp, and a few other tools (which i'll reveal in the Hair tutorial ), i finish the hair of the face. Other than that, i also tamper around with the Hue/Saturation (Ctrl+U) and Brightness/Contrast controls to give Brutus his real-life skin color. And the final result is this:-

~FINAL NOTES~
I had no intention to release this tutorial.... as some individuals failed to realise the exact purpose of this tutorial... There is a perfectly good reason why "this" face tutorial is called a "LAST RESORT face tutorial".... so i am gonna say it in Caps this time (to make it clear).... THIS TUTORIAL IS ONLY MEANT TO BE USED AS A LAST RESORT IF U ARE UNABLE TO FIND A DECENT SNAPSHOT OF THE WRESTLER YOU ARE MODDING!!!!!! I am warning u beforehand, if ur wrestler's face's snapshot's quality is excellent, dont think of using this tutorial as in that case, the results of ur face texture wud be crap as compared to the snapshot u started with in the beginning!!!! But still, since a few members wanted to use this tutorial anyhow, i am releasing this once again... cheers, Snyper.
